LG DLGX9501K User Manual Page 19
- Page / 108
- Table of contents
- TROUBLESHOOTING
- BOOKMARKS
- OWNER’S MANUAL 1
- TABLE OF CONTENTS 2
- 4
- 5
- 7
- SPECIAL FEATURES 9
- PRODUCT OVERVIEW 10
- Control Panel Features 11
- WARNING : 12
- INSTALLATION 13
- Clearances 14
- (207.2 cm) 15
- (207,2 cm) 15
- Leveling the Dryer 16
- Reversing the Door 17
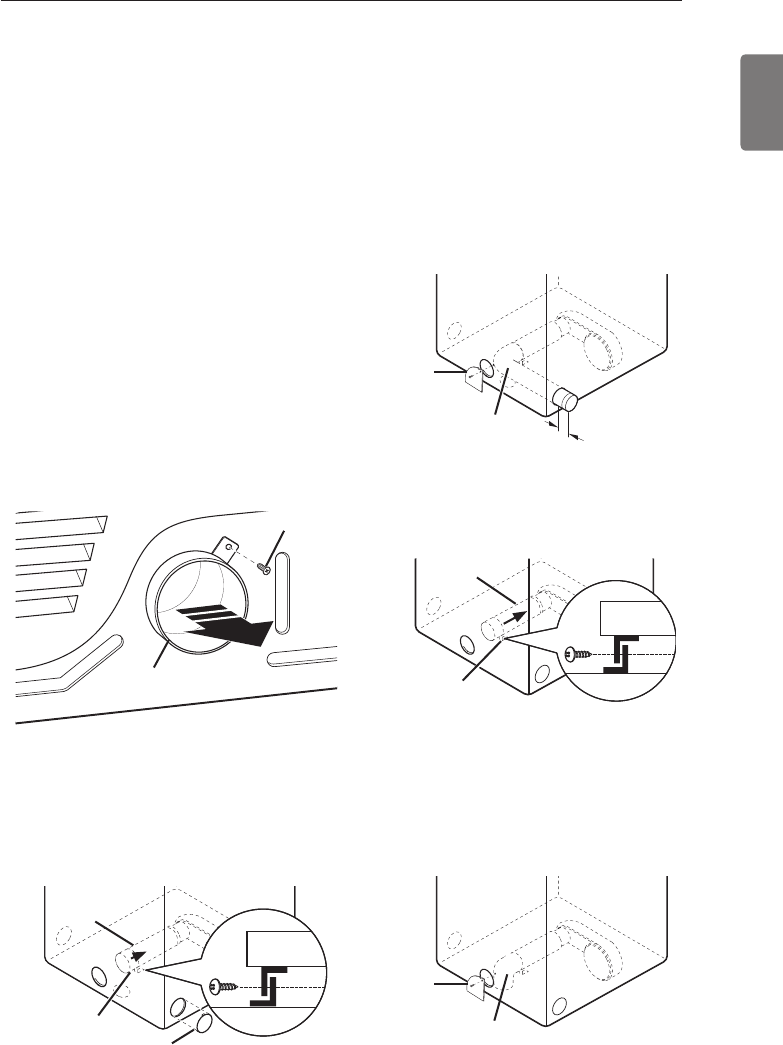
- Installing the Side Vent Kit 19
- Venting the Dryer 20
- Venting the Dryer (cont.) 21
- Connecting the Inlet Hose 22
- Connecting Gas Dryers 23
- Connecting Gas Dryers (cont.) 24
- Connecting Electric Dryers 25
- USA only 26
- Special Requirements for 30
- Manufactured or Mobile Homes 30
- Final Installation Check 30
- OPERATION 33
- Cycle Guide 34
- Storage Under the Lid 35
- Sorting Loads 35
- Loading the Dryer 35
- Using the Lid 36
- Cycle Modifier Buttons 37
- Special Functions 38
- Custom Program 39
- Steam Functions 39
- Steam Functions (cont.) 40
- Steam Cycle Guide 40
- SMART APPLIANCE CONNECTIVITY 41
- Smart ThinQ™ 42
- USING Smart Diagnosis 44
- MAINTENANCE 45
- TROUBLESHOOTING 46
- SPECIFICATIONS 49
- WARRANTY (USA) 50
- WARRANTY 51
- SECADORA 53
- TABLA DE CONTENIDOS 54
- ADVERTENCIA 55
- 59
- INFORMACIÓN TRANSMISOR MÓDULO 60
- CARACTERÍSTICAS ESPECIALES 61
- DESCRIPCIÓN DEL PRODUCTO 62
- Operación 63
- Pantalla 64
- INSTALACIÓN 65
- Sistema de conducto 73
- Manguera de entrada 74
- Prueba de Instalación 83
- (Comprobación del sistema de 83
- CÓMO USAR 85
- Guía de ciclos 86
- Uso de la Tapa 88
- Funciones especiales 90
- Programa personalizado 91
- Funciones de vapor 91
- Funciones de vapor (cont.) 92
- Guía de ciclo de vapor 92
- Diagnóstico sonoro 96
- MANTENIMIENTO 97
- RESOLUCIÓN DE PROBLEMAS 98
- ESPECIFICACIONES 101
- GARANTÍA (EE. UU.) 102
- GARANTÍA 103
- Customer Information Center 108
- 1-888-542-2623 CANADA 108
Related products and manuals for Electric laundry dryers LG DLGX9501K

 (117 pages)
(108 pages)
(100 pages)
(100 pages)
(100 pages)
(117 pages)
(108 pages)
(100 pages)
(100 pages)
(100 pages)
 (16 pages)
(100 pages)
(100 pages)
(16 pages)
(100 pages)
(100 pages)
© 2020, manymanuals.com. All rights reserved. | 1.222 s |
 Manymanuals.com
 Manymanuals.de
 Manymanuals.fr
 Manymanuals.it
 Manymanuals.pl
 Manymanuals.cz
 Manymanuals.es
 Manymanuals-pt.com
Comments to this Manuals